In this guide, we will only cover the standard plugin installation methods that are available directly from the WordPress site admin panel. For posts that talk about other options for downloading and activating plugins, I will provide links at the end of this article.
Install plugin from official repository
WordPress has a large library of official and proven plugins. You can find and install them from the admin panel of your site. In the side menu, find the “Plugins” item and click on the “Add New” link. On the page that opens, you will be able to use search and filter.
You can search by keyword, author or tag.

To the left of the search field is a filter. Here you can sort plugins by the following parameters:
- Featured
- Popular
- Recommended
- Favorites
The “Favorites” tab deserves special attention. The plugins you have favorited on WordPress.org are displayed here (registration required). For example, I like the Elementor plugin for some reason and added it to my list.

From now on, it shows up in the relevant tab when I log in to WordPress.org.

Also, access to this list can be obtained in the dashboard of your site. Go to the “Favorites” tab, enter your WordPress.org username in the appropriate field and click the “Get Favorites” button.

If you use the same plugins on many sites, this functionality is quite handy.
Fine. The required plugin was found. If you haven’t used it before, you may need more information. Each plugin card contains the following:
- Title;
- Short description;
- Author;
- Rating;
- Number of installations;
- Last update;
Compatibility with WordPress version.

Need more details? Click on the “More Details” link, which will open a window with detailed information about this plugin. Already decided? Click on the button “Install”.
After installation, the “Activate” button will appear. Click on it and you will be taken to the page of all the plugins installed on the site. The process is complete.
You can choose not to activate the plugin immediately if you need to continue searching for and installing other plugins. After you have installed all the required plugins, go to the “Plugins” section of the side menu and follow the “Installed plugins” link. On this page, you can activate each plugin separately by clicking on the appropriate link.

Or activate plugins in bulk. To do this, check the checkboxes next to the required plugins, select the “Activate” item in the “Bulk actions” drop-down list and click the “Apply” button. To do this, check the checkboxes next to the plugins you need, select the “Activate” item in the “Bulk actions” drop-down list and click the “Apply” button.
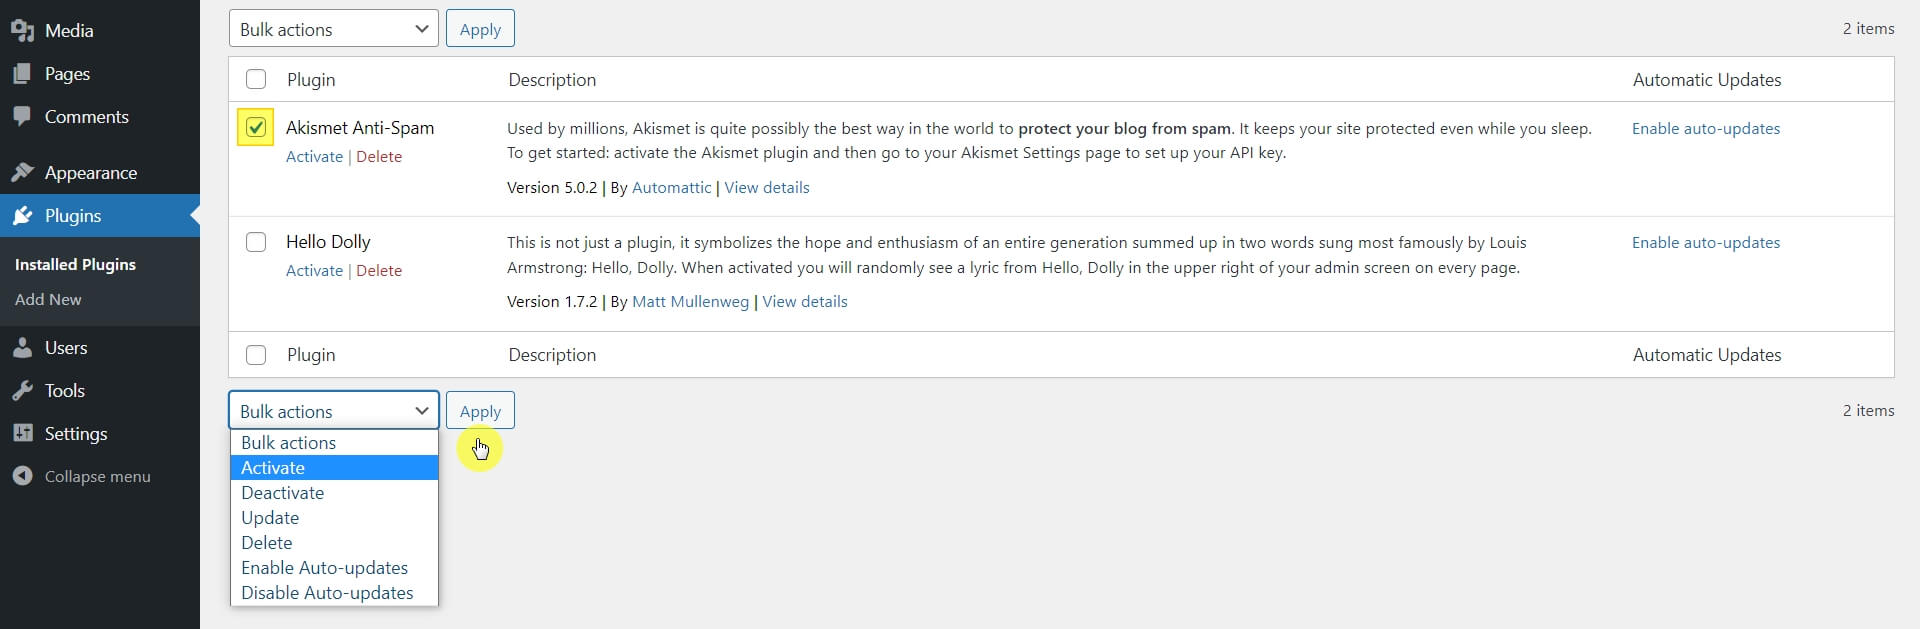
Also, in this list, you can choose the following bulk plugin management actions:
- Activate
- Dectivate
- Update
- Delete
- Enable Auto-updates
- Disable Auto-updates
Upload the plugin zip file
Of course, the WordPress repository has a large list of plugins. But quite often, you may need to install plugins from outside of it. For example, you have purchased a premium plugin. The developer will provide you with a zip file. Or you downloaded a free plugin whose author does not host it on WordPress.org (there are many such plugins on GitHub).
By the way, you can also download plugins from the WP repository.

So, you have downloaded the plugin. Now the task is to upload it to the site and activate it. To do this, go to the already familiar “Add Plugins” page (side menu, “Plugins” item, “Add New” link). Here, click the “Upload Plugin” button, and in the field that appears, add the zip file of the plugin that you should choose to the disk of your device. After that, click the “Install Now” button.
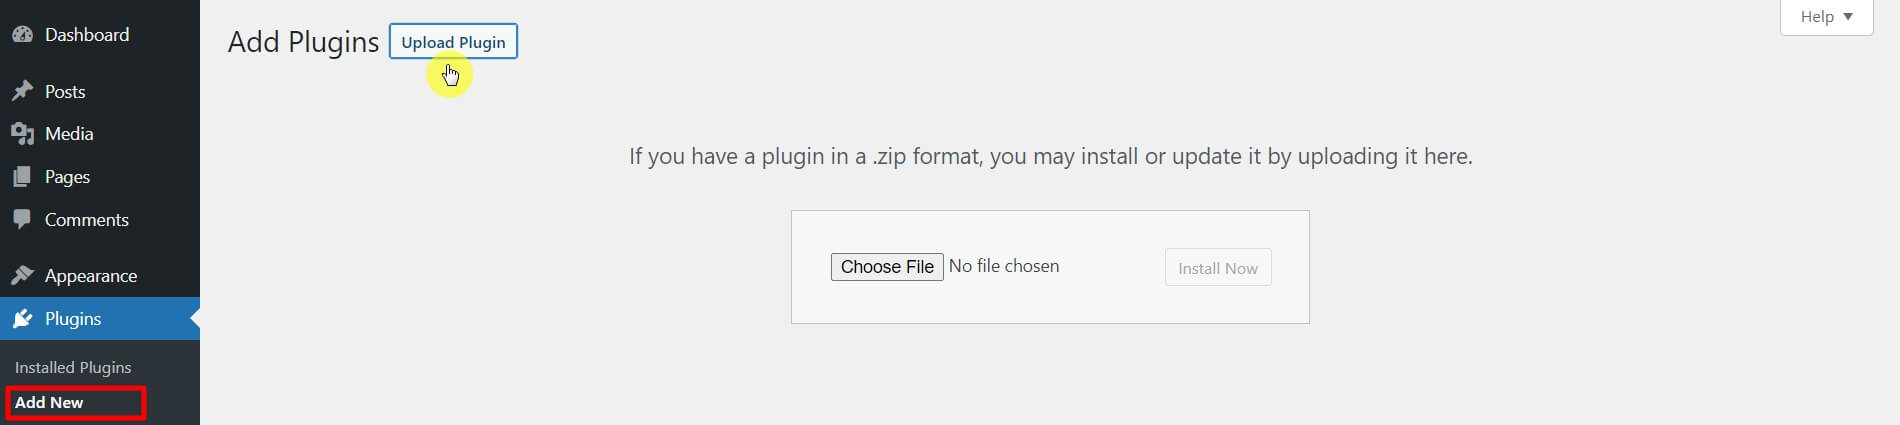
After uploading the plugin, you will be prompted to activate it or continue installing plugins.

Other upload and activation/deactivation methods
If you don’t have the ability to work with the list of plugins through the site’s admin panel, or you manage the site remotely, then other ways to upload and activate/deactivate plugins will come in handy.
You can upload the zip file of the plugin to the server via FTP (File Transfer Protocol) or using the file manager on the hosting (if such a service is available). But to activate the uploaded plugin, you will still need to enter the site’s admin panel and activate it in the standard way, as described above. In the case when all this needs to be done remotely, there are several methods.
You can activate/deactivate plugins without entering the WordPress admin panel via the site database or using the WP-CLI command line tool.
But what if you urgently need to disable a plugin that has broken the site? Also, you don’t have access to the dashboard, don’t understand WP-CLI and databases. Then you can deactivate the plugin via FTP or file manager.
